Secure Vue.js App with Spring Boot Security 3 and JWT Auth |
您所在的位置:网站首页 › spring security vue › Secure Vue.js App with Spring Boot Security 3 and JWT Auth |
Secure Vue.js App with Spring Boot Security 3 and JWT Auth
|
This tutorial discusses how to implement user login and logout functionality using Vue.js and Spring Boot Security. The primary purpose of this article is to guide developers through creating a secure login system using Spring Boot and Vue.js. We will implement a demo application to showcase how the login and logout functionalities work together. In this article, we are modifying the application developed for Vuejs and Spring Boot CRUD example by adding login/logout functionality. 1. PrerequisitesTo follow this tutorial, we should have a basic understanding of the following: Vue.js Spring Boot JWT (JSON Web Token) 2. MavenTo configure Spring Boot Security, we need to add the following Maven dependencies to our pom.xml file: io.jsonwebtoken jjwt-api 0.11.5 io.jsonwebtoken jjwt-impl 0.11.5 io.jsonwebtoken jjwt-jackson 0.11.5 org.springframework.boot spring-boot-starter-security jjwt-api: is the JSON Web Token (JWT) API for Java which provides a simple way to generate and parse JWT tokens. jjwt-impl: is the implementation of the JWT API and provides the core functionality for generating and parsing JWT tokens. jjwt-jackson: is a JSON library for working with JSON Web Tokens. It supports reading and writing the tokens using the Jackson JSON library. spring-boot-starter-security: is a starter for using security in a Spring Boot project. It provides all the necessary dependencies to use Spring Security, including the core library, configuration, and other features. It can be used to add authentication and authorization to our spring boot application. 3. JWT Authentication Flow with Spring SecurityBefore digging deep into the tiny details, let us first understand the authentication process at a high level. 3.1. Login WorkflowThe following diagram depicts the process of login when a user submits the username/password into the login screen and the server responds with the JWT token to be sent in all subsequent requests. 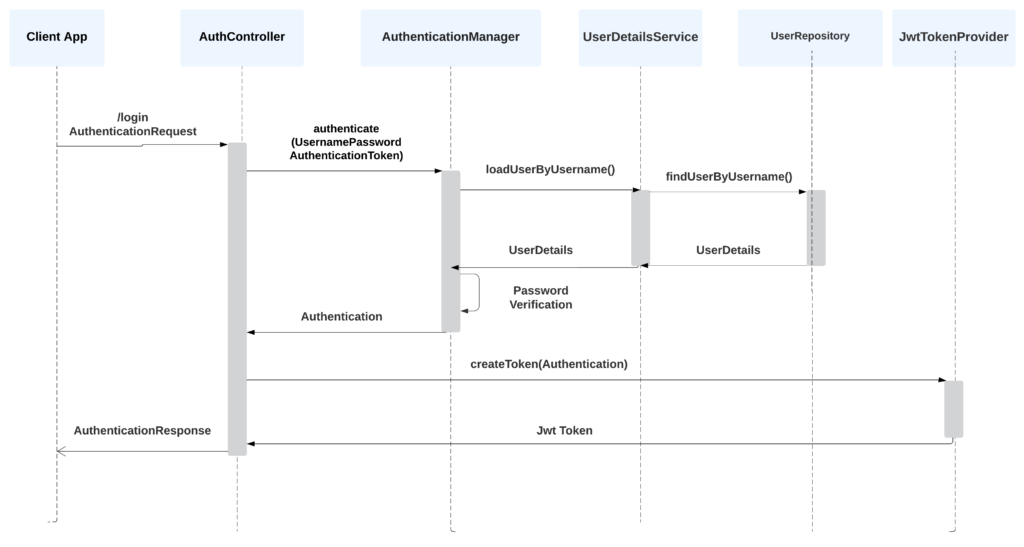
Here is how the login flow works: The client makes a POST request to the /login endpoint with a JSON payload that contains the user’s username and password (AuthenticationRequest). The authenticateUser() method in the AuthController class receives this request and uses the AuthenticationManager to authenticate the user’s credentials. The AuthenticationManager verifies the user’s identity by checking if the username and password match a record in the backend/database. If the user’s credentials are valid, an Authentication object is returned. This object contains information about the authenticated user, such as their username and granted authorities. The SecurityContextHolder is updated with the authenticated Authentication object so it can be obtained anywhere in the application. The JwtTokenProvider uses the Authentication to create a JWT token for the authenticated user. This token contains the user’s username, authorities, and expiration time. The server responds to the client with a 200 OK status code and a JSON payload containing the JWT token (AuthenticationResponse). The client must store this token and include it in the headers of future requests to access protected endpoints. 3.2. Authentication WorkflowThe following diagram depicts the process when a user requests a protected resource and the request contains the Jwt token. The spring security extracts the token and validates the user’s identity before sending the response. 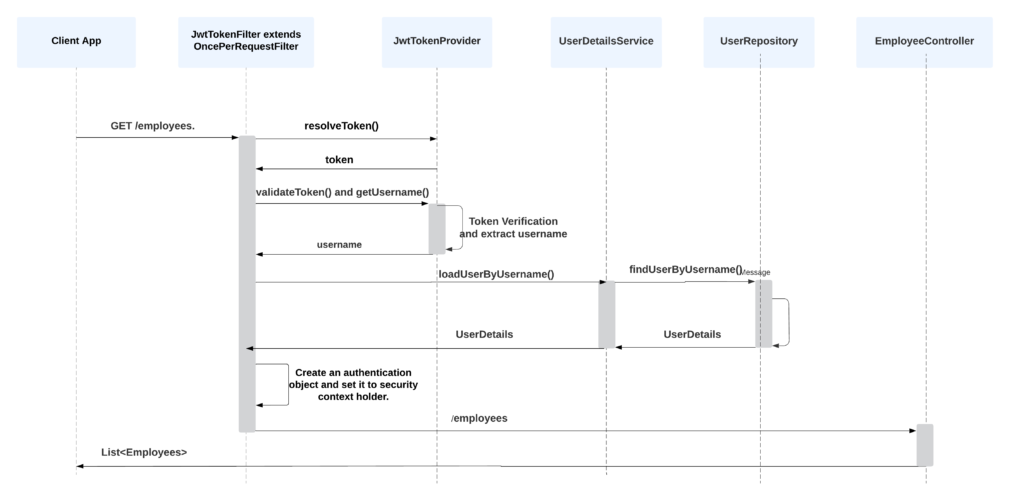
Here’s a summary of what happens when you send a request to /employees: The JwtTokenFilter intercepts the request before it reaches the /employees endpoint. It retrieves the JWT token from the Authorization header of the request using JwtTokenProvider.resolveToken(). If the token is found, it is validated using the validateToken(). If the token is valid, the filter loads the user details associated with the token using the loadUserByUsername method of UserDetailsService. It then creates an authentication object of type UsernamePasswordAuthenticationToken and sets it in the SecurityContextHolder. Finally, the filter chain is called to pass the request and response to the next filter or to the endpoint. 4. Spring Security ImplementationLet us deep dive into changes in each class and how they help the whole process. It is highly recommended first to read how Spring security works with UserDetailsService. 4.1. Security ConfigurationThe SecurityConfig defines important beans such as AuthenticationManager, AuthenticationProvider, UserDetailsService and SecurityFilterChain which are essential for implementing authentication and authorization in a Spring Security application. @EnableWebSecurity @Configuration public class SecurityConfig { private final JwtTokenFilter jwtAuthenticationFilter; private final UserDetailsService userDetailsService; private final DaoAuthenticationProvider daoAuthenticationProvider; public SecurityConfig(JwtTokenFilter jwtAuthenticationFilter, UserDetailsService userDetailsService, DaoAuthenticationProvider daoAuthenticationProvider) { this.jwtAuthenticationFilter = jwtAuthenticationFilter; this.userDetailsService = userDetailsService; this.daoAuthenticationProvider = daoAuthenticationProvider; } @Bean public AuthenticationProvider authenticationProvider() { daoAuthenticationProvider.setUserDetailsService(userDetailsService); daoAuthenticationProvider.setPasswordEncoder(passwordEncoder()); return daoAuthenticationProvider; } @Bean PasswordEncoder passwordEncoder() { return NoOpPasswordEncoder.getInstance(); } @Bean AuthenticationManager authenticationManager(AuthenticationConfiguration authenticationConfiguration) throws Exception { return authenticationConfiguration.getAuthenticationManager(); } @Bean public SecurityFilterChain securityFilterChain(HttpSecurity httpSecurity) throws Exception { httpSecurity.headers().frameOptions().disable(); httpSecurity.cors().and().csrf().disable(); //@formatter:off httpSecurity .authorizeHttpRequests() .requestMatchers("/api/auth/**").permitAll() .anyRequest().authenticated() .and() .sessionManagement() .sessionCreationPolicy(SessionCreationPolicy.STATELESS) .and() .exceptionHandling() .authenticationEntryPoint( (request, response, authException) -> response.sendError( HttpServletResponse.SC_UNAUTHORIZED, authException.getLocalizedMessage() ) ) .and() .authenticationProvider(authenticationProvider()) .addFilterBefore(jwtAuthenticationFilter, UsernamePasswordAuthenticationFilter.class); //@formatter:on return httpSecurity.build(); } }Let us note down a few essential details. AuthenticationManagerThe AuthenticationManager coordinates and manages the authentication flow, allowing the application to delegate the authentication process to multiple providers. Each provider can have authentication mechanisms, such as username/password, social login, or multi-factor authentication. When a user attempts to log in, the application delegates the authentication to the AuthenticationManager. The AuthenticationManager then selects the appropriate AuthenticationProvider based on the request type and forwards the request to the configured provider. AuthenticationProviderThe AuthenticationProvider interface exposes only two functions: authenticate() performs authentication. supports() checks if the provider supports the indicated authentication type.One important interface implementation is DaoAuthenticationProvider, which retrieves user details from a UserDetailsService. The UserDetailsService interface contains a single method loadUserByUsername(), which takes a username as a parameter and returns a UserDetails object. The UserDetails object contains the user’s security-related information such as password, authorities, and account status. SecuritFilterChainThe SecurityFilterChain is a crucial component in Spring Security and is responsible for applying various security filters, such as authentication and authorization filters, to incoming HTTP requests. In the securityFilterChain() method, the HttpSecurity object is used to configure various security settings, such as CORS, CSRF protection, session management, and exception handling. It also adds a custom authentication provider and a JWT authentication filter to the filter chain. The SpringSecurityConfigurerAdapter class has been deprecated since Spring Security 5.3, and instead, it is recommended to use the SecurityFilterChain bean to configure Spring Security. The SecurityFilterChain bean allows for more fine-grained control over the configuration of the filter chain and provides better customization options. 4.2. Authentication FilterTo implement our authentication and authorization logic, we are using three classes: JwtTokenProvider JwtTokenFilter JwtAuthenticationEntryPoint JwtTokenProviderJwtTokenProvider is responsible for generating a JWT token for an authenticated user. It creates a token using the user’s username, current time, and expiration time. JwtTokenProvider also provides methods for resolving and validating a token. @Component @Slf4j public class JwtTokenProvider { Key key = Keys.secretKeyFor(SignatureAlgorithm.HS512); public String createToken(Authentication authentication) { UserDetails userDetails = (UserDetails) authentication.getPrincipal(); Date now = new Date(); Date expiryDate = new Date(now.getTime() + 3600000); return Jwts.builder() .setSubject(userDetails.getUsername()) .setIssuedAt(new Date()) .setExpiration(expiryDate) .signWith(SignatureAlgorithm.HS512, key) .compact(); } public String resolveToken(HttpServletRequest request) { String bearerToken = request.getHeader("Authorization"); if (StringUtils.hasText(bearerToken) && bearerToken.startsWith("Bearer ")) { return bearerToken.substring(7); } return null; } // Check if the token is valid and not expired public boolean validateToken(String token) { try { Jwts.parser().setSigningKey(key).parseClaimsJws(token); return true; } catch (MalformedJwtException ex) { log.error("Invalid JWT token"); } catch (ExpiredJwtException ex) { log.error("Expired JWT token"); } catch (UnsupportedJwtException ex) { log.error("Unsupported JWT token"); } catch (IllegalArgumentException ex) { log.error("JWT claims string is empty"); } catch (SignatureException e) { log.error("there is an error with the signature of you token "); } return false; } // Extract the username from the JWT token public String getUsername(String token) { return Jwts.parser() .setSigningKey(key) .parseClaimsJws(token) .getBody() .getSubject(); } } JwtTokenFilterJwtTokenFilter is an implementation of the OncePerRequestFilter abstract class, which ensures that the filter is only executed once per request. JwtTokenFilter is a filter that intercepts every request and checks whether it contains a valid JWT token in the Authorization header. If a valid token is found, JwtTokenFilter retrieves the user details from the token using JwtTokenProvider, creates an Authentication object, and sets it in the security context. @Component @AllArgsConstructor public class JwtTokenFilter extends OncePerRequestFilter { private JwtTokenProvider jwtTokenProvider; private UserDetailsService userDetailsService; @Override protected void doFilterInternal(HttpServletRequest request, HttpServletResponse response, FilterChain filterChain) throws ServletException, IOException { String token = jwtTokenProvider.resolveToken(request); if (token != null && jwtTokenProvider.validateToken(token)) { UserDetails userDetails = userDetailsService.loadUserByUsername(jwtTokenProvider.getUsername(token)); UsernamePasswordAuthenticationToken authentication = new UsernamePasswordAuthenticationToken(userDetails, null, userDetails.getAuthorities()); authentication.setDetails(new WebAuthenticationDetailsSource().buildDetails(request)); SecurityContextHolder.getContext().setAuthentication(authentication); } filterChain.doFilter(request, response); } }In the JwtTokenFilter, if the token is not valid/exist , then the code simply continues to the next filter in the filter chain without setting any Authentication object. You may ask why we don’t return a 401 error directly if the JWT token doesn’t exist or is invalid. That’s a great question! This behavior is intentional because not all endpoints might require authentication, and in some cases, it might be valid for the user not to be authenticated to access public APIs. When the JwtTokenFilter sets an Authentication object in the SecurityContextHolder, Spring Security automatically handles the authentication process for subsequent requests in the same thread. JwtAuthenticationEntryPointJwtAuthenticationEntryPoint is an authentication entry point that handles authentication errors. If a user tries to access a protected resource without a valid token, JwtAuthenticationEntryPoint is triggered and sends a 401 Unauthorized response. @Component public class JwtAuthenticationEntryPoint extends BasicAuthenticationEntryPoint { @Override public void commence(HttpServletRequest request, HttpServletResponse response, AuthenticationException authException) throws IOException, IOException { response.setStatus(HttpServletResponse.SC_UNAUTHORIZED); response.setContentType("application/json"); response.getWriter().write("{ \"message\": \"" + authException.getMessage() + "\" }"); } @Override public void afterPropertiesSet() { setRealmName("JWT Authentication"); super.afterPropertiesSet(); } } 4.3. Authentication ProviderIn our implementation, the DaoAuthenticationProvider uses the UserDetailsService interface that retrieves UserDetails from the database using the UserRepository. The UserRepository is responsible for interacting with the database and retrieving user information. UserRepository @Repository public interface UserRepository extends JpaRepository { Optional findByEmail(String email); } UserDetailsService Implementation @Service public class CustomUserDetailsService implements UserDetailsService { @Autowired private UserRepository userRepository; @Override public UserDetails loadUserByUsername(String username) throws UsernameNotFoundException { try { return userRepository.findByUsername(username) .orElseThrow(() -> new Exception("user Not found ")); } catch (Exception e) { throw new RuntimeException(e); } } } 5. Login EndpointNow let us understand what happens when application invokes the /login with username/password. 5.1. ControllerThe AuthController is a standard REST Controller. The login method first authenticates the user using the AuthenticationManager and sets the authentication object in the security context. @RestController @CrossOrigin @RequestMapping("/api/auth") public class AuthController { @Autowired private AuthenticationManager authenticationManager; @Autowired private JwtTokenProvider jwtTokenProvider; @PostMapping("/login") public ResponseEntity authenticateUser(@RequestBody AuthenticationRequest authenticationRequest) { Authentication authentication = authenticationManager.authenticate( new UsernamePasswordAuthenticationToken( authenticationRequest.getUsername(), authenticationRequest.getPassword() ) ); SecurityContextHolder.getContext().setAuthentication(authentication); String jwt = jwtTokenProvider.createToken(authentication); return ResponseEntity.ok(new AuthenticationResponse(jwt)); } @GetMapping("/test") public ResponseEntity test() { return ResponseEntity.ok(" you have access now "); } } 5.2. TestNow if we try to access one of our endpoints, we will get the unauthorized message: 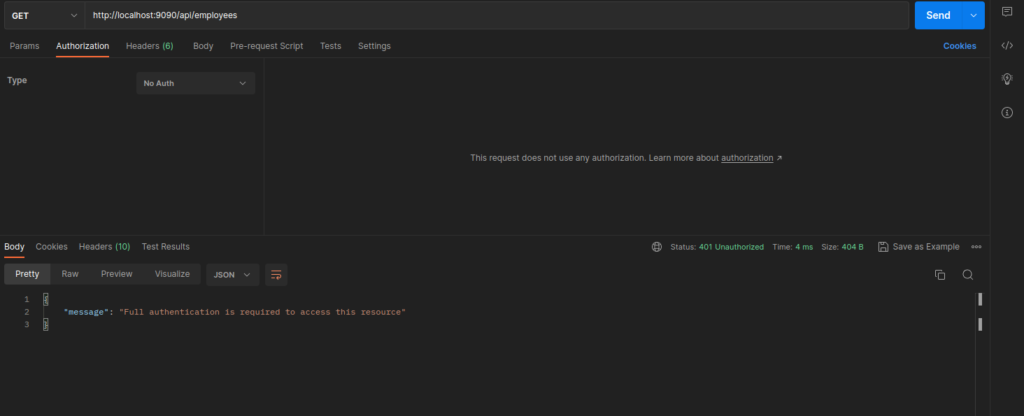
Send a request to /api/auth/login with the username and password in the request body, and we will get an access token. 
Add the access token in the Authorization header to access now the /employees endpoint. 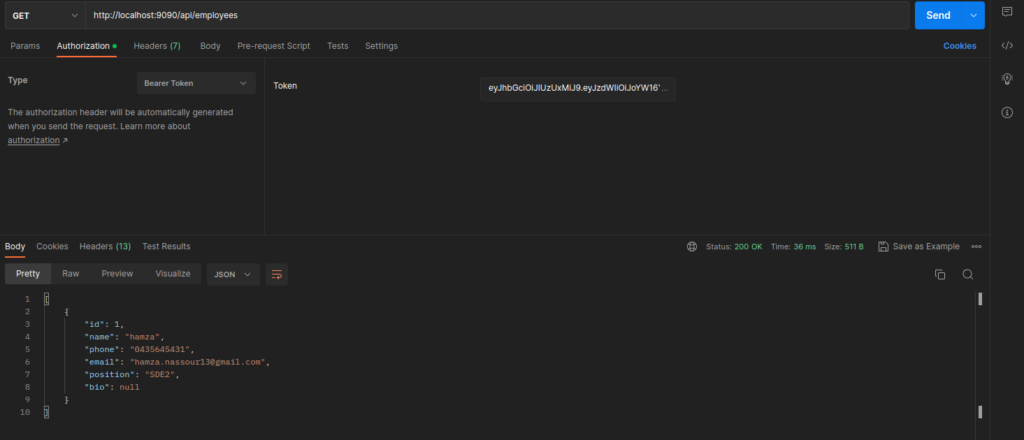 6. Front-end with Vue.js
The following diagram depicts the login flow on the client application side. 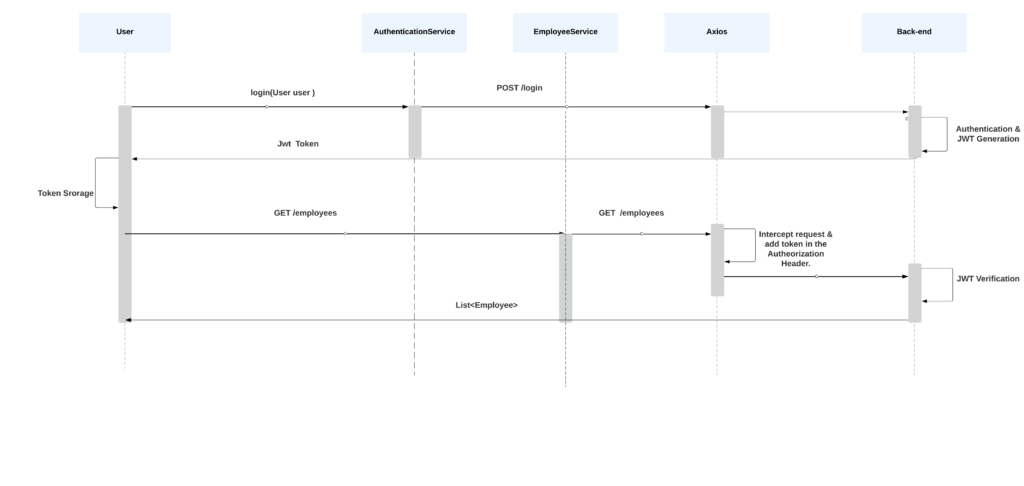
At a high level, login and logout functionality is implemented as follows: The user requests a login endpoint (with username & password). Spring Boot Security authenticates the user, generates a JWT token containing the user’s information, and sends it back. The application stores the token in the browser’s local storage. For subsequent requests, the user sends the token along with the request headers (using Axios interceptors). Spring Boot Security verifies the token’s signature and extracts the user’s information to authorize the request. The token is invalidated and removed from the browser’s local storage when the user logs out. 6.1. Login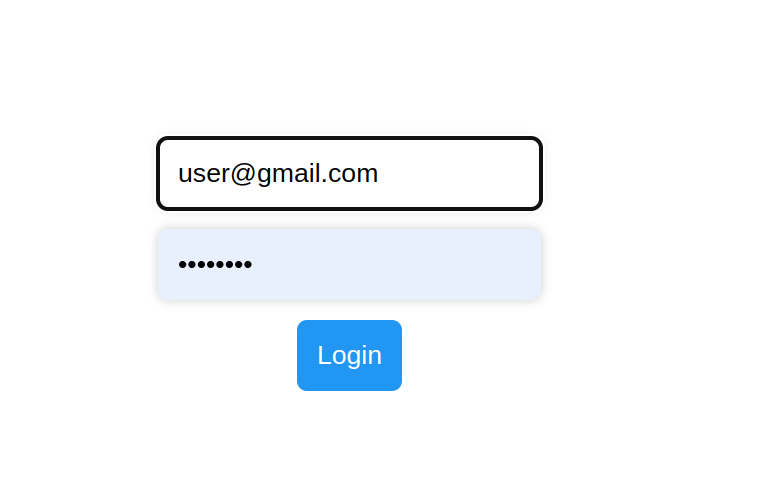 LoginForm
To implement the login form, we can create a LoginForm.vue component that contains a form with username and password fields. When the user clicks the “Login” button, the login() method is called. The login() method sends a POST request to the /auth/login endpoint of the backend using the Axios. If the server responds with a successful login, the response will contain an accessToken property, which the login() method stores in the browser’s localStorage under the key "jwtToken". Finally, the method redirects the user to the home page (“/”) using window.location.href. Login import AuthService from "@/services/AuthService"; import router from "@/router"; export default { data() { return { user: { username: "", password: "", }, }; }, methods: { login() { AuthService.login(this.user).then((response) => { if (response.data.accessToken) { window.localStorage.clear(); window.localStorage.setItem("jwtToken", response.data.accessToken); } window.location.href = "/"; }); }, }, }; //CSS code removed for brevity AuthService import apiClient from "@/utils/apiClient"; // apiClient is an axios instance class AuthService { login = async (user: any): Promise => { return await apiClient.post("/auth/login", { username: user.username, password: user.password, }); }; logout() { window.localStorage.removeItem("jwtToken"); router.push("/login"); } } export default new AuthService(); 6.2. Including the Token in the Authorization HeaderTo include a token with each request, we use Axios interceptors which intercept the request and add the token to the Authorization header as a bearer token before sending it. import axios, { AxiosInstance } from "axios"; const API_URL = "http://localhost:9090/api"; const axiosInstance: AxiosInstance = axios.create({ baseURL: API_URL, headers: { "Content-Type": "application/json", }, withCredentials: true, }); const token = localStorage.getItem("jwtToken"); axiosInstance.interceptors.request.use( (config) => { config.headers.Authorization = `Bearer ${token}`; return config; }, (error) => { return Promise.reject(error); } ); export default axiosInstance; 6.3. Logoutwe can remove the JWT token from the browser’s localStorage. This will log the user out of their session until they request a fresh token from the server. window.localStorage.removeItem('jwtToken'); router.push('/login'); 7. ConclusionImplementing the JWT authentication in a Vue.js and Spring Security application is a secure and efficient way to protect your users’ data and resources specially the REST APIs called by single page applications (SPA). In this article, we’ve explored the fundamental concepts behind JWT authentication, including token-based authentication. We’ve also demonstrated how to integrate JWT authentication in the front end and the backend side, covering everything from retrieving and validating tokens and processing success/error scenarios. Happy Learning !! Source Code on Github Related posts: Basic Auth with Spring Security Custom Authentication Providers in Spring Security Spring Security Database-backed Form Login Test Spring Security Auth with JUnit Disable Spring Security in Spring Boot OAuth2 Login with Spring Boot Security |
【本文地址】